To follow up a recent video showcasing the NASA Apollo Costs, I wanted to illustrate how easy it is to use PowerBI to generate quick program of works dashboard. If you have several projects following a pipeline of work, some features here might spur some discussions or thoughts on what is possible.
The Data
I have sourced data from a google drive folder
However, like most data you find, the format is not suited to analytics. So a little manipulation was in order. Firstly, I had to create a WBS structure. Typically, information we find is buried under headers, however for databases, we need to turn group headings into a column data field.

We can see I have inserted a 3 layer WBS structure, plus a company name field. This will allow me the flexibility to add subsequent data to this file from perhaps multiple companies, not just NASA. Again, when you build flexible data structures, the way you can use the structure is much more powerful
I know that I also want more contextual information displayed on the dashboard beyond simple data. Specifically, I want a description blurb to be viewable on a tool tip, along with a picture. Additionally, I want to display the leading contractor as well. Therefore, I added a few columns to the excel file. When you import the data into PowerBI, the URL needs to be set as a special format of “Image URL”. Took for some time to find that setting: its under “data category” on the column tools tab.

At some point, I will hopefully build out this dataset to include subsequent NASA budgets, and also publish this data through an API that everyone can access. However, there are limitation to what I can do and what I want to do typically far outstrips my abilities.
The Dashboard
Importing the data is quite straight forward, we do need our usual “unpivot” trick to convert the year information (which is contained inside columns) into row based data. However once that is done, lets look the various parts of the dashboard.
Before I jump into the various aspects of the dashboard, what really gives a dashboard a little polish is the use of a background image. Here is my go to ground image. Just a little playing around with Paint can produce something very valuable to your end product.

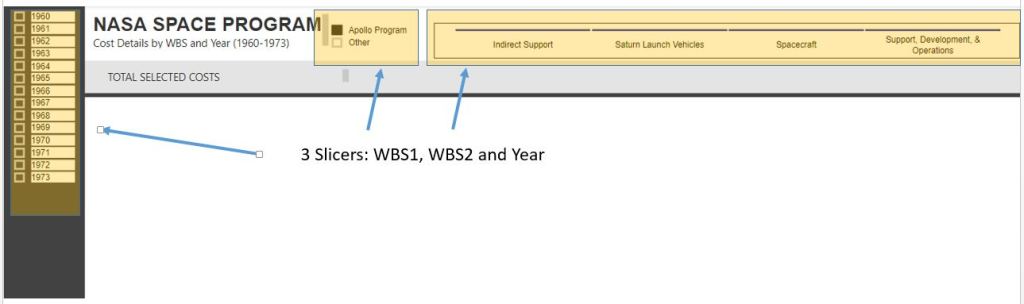
The dashboard utilizes 3 slicers. Each has a slightly different formatting. I definitely recommend playing around with the formatting of your slicers
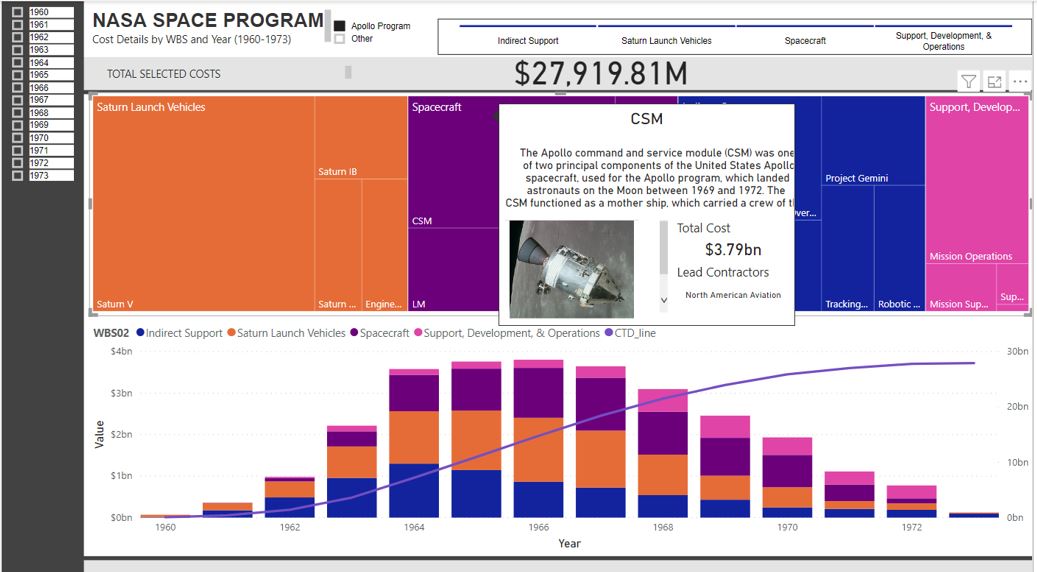
The TREEMAP is where I have put a little extra bit of attention

What pops out here is the tooltip. I have created a separate page just for this tooltip. I am by no means an expert in designing tooltip, but know the power of inserting extra dimensions of data that again allows your dashboard to pop. This specific tooltip includes the blurb, an image URL and the main contractors. This information would be too dense for the overall dashboard and perhaps not dense enough for its own dash, therefore a tooltip is a perfect medium between.
The final element of the dashboard is the line graph and histogram. I still find creating line graphs difficult and in this case I had to add a measure to my data. I think there is a much easier way to achieve rolling sum data, but in my case, the below measure works easy enough for me.
CTD_line = CALCULATE(SUM(NASA_Budgets[Value]),filter(ALLSELECTED(NASA_Budgets),NASA_Budgets[Year]<=MAX(NASA_Budgets[Year])))
And with that, we have our completed dashboard

Extensions
There is a lot I can do with this framework now. We have a cost file that is quite generic and a dashboard that is also generic. We can in theory use this to outline any type of project pipeline. Although this dashboard is looking in the past, we can also have a rolling wave where we can see past spend on specific projects and what our future pipeline of work looks like. I love seeing project pipelines and following my NASA theme for the moment, here is a great view of what the NASA project pipeline looked like in 1973

